Showing posts with label Cooking and preserving. Show all posts

Wednesday, 9 May 2018

Slash your food miles: go local

Rhubarb, one of the earliest crops of the year
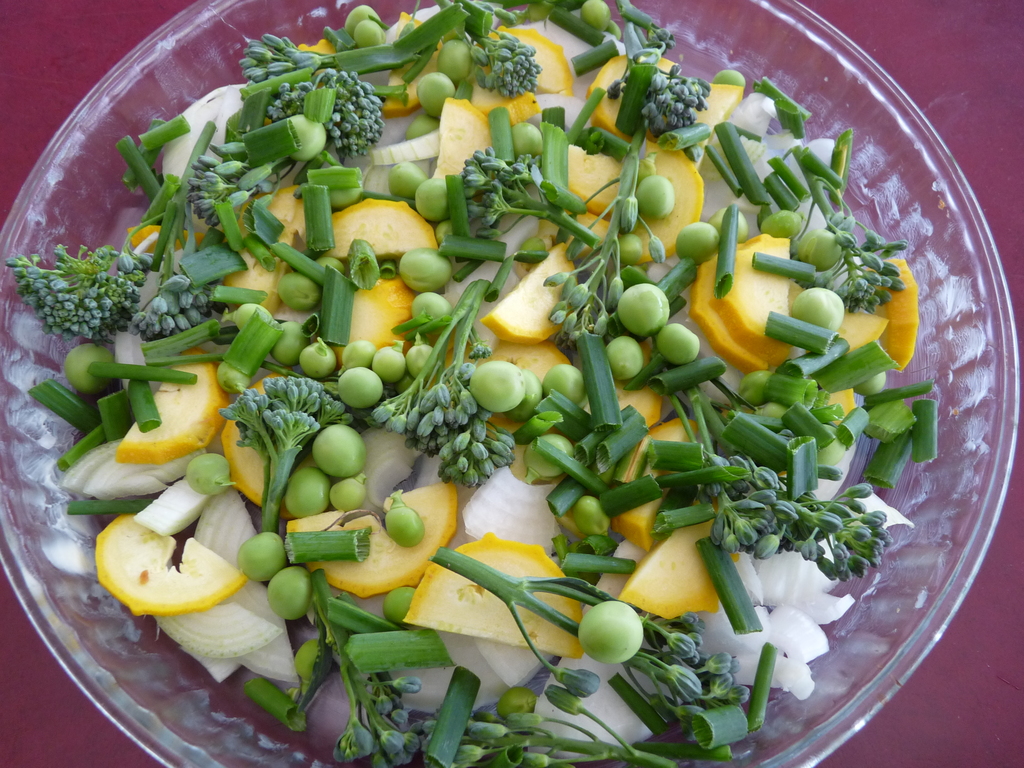
Scottish kimchi veg mix
A big part of being self-reliant means relying on home-grown and locally grown produce rather than buying imported food stuffs. Apart from cutting out unnecessary food miles and the pollution they bring, this also has the benefit of reconnecting us to the seasons, learning what is around at what time of year, what can be foraged and what is grown commercially around us. By sticking to what’s in season locally (or at least in your country), you only eat what’s freshest and therefore tastiest and most nutritious.

Until you start growing yourself, it can be hard to know what is in season. We found it very encouraging just how much we can grow throughout the year in our maritime climate, and this can even be extended further with a polytunnel, greenhouse, conservatory, cloches or a simple home-made cold frame.

We particularly like the way seasonal eating divides up the year. There is always something different to look forward to in every season: rhubarb, globe artichokes, broad beans, strawberries, new potatoes, raspberries, apples, Brussels sprouts. It’s a shift from ‘what do I feel like eating’ to ‘what is there to eat’, but once it’s made it comes very naturally. And, once you’re used to the intense flavours of your home-grown produce, exotic supermarket fruit and veg tend to taste bland – no wonder when they’ve been picked before they’re ripe. We’d rather have our chemical-free frozen berries in the winter than buy any ‘fresh’ supermarket berries from the southern hemisphere!

However, eating local and seasonal food doesn’t mean that you can’t experience the joys of world cuisine – you just have to be a bit flexible with the ingredients. We recently started making what we call ‘Scotchi’, kimchi made using only Scottish ingredients. You’d be hard pressed to guess that it didn’t have any ginger in it since the tang from the locally foraged hogweed seeds is very similar. Since we like Asian cooking we have even gone so far as to make our fish sauce from own-caught pollock, garlic and herbs from the garden. However, if you don’t want to go to these lengths you could substitute fish sauce for something with a similar umami flavour, like lovage, which is also a great replacement for MSG.
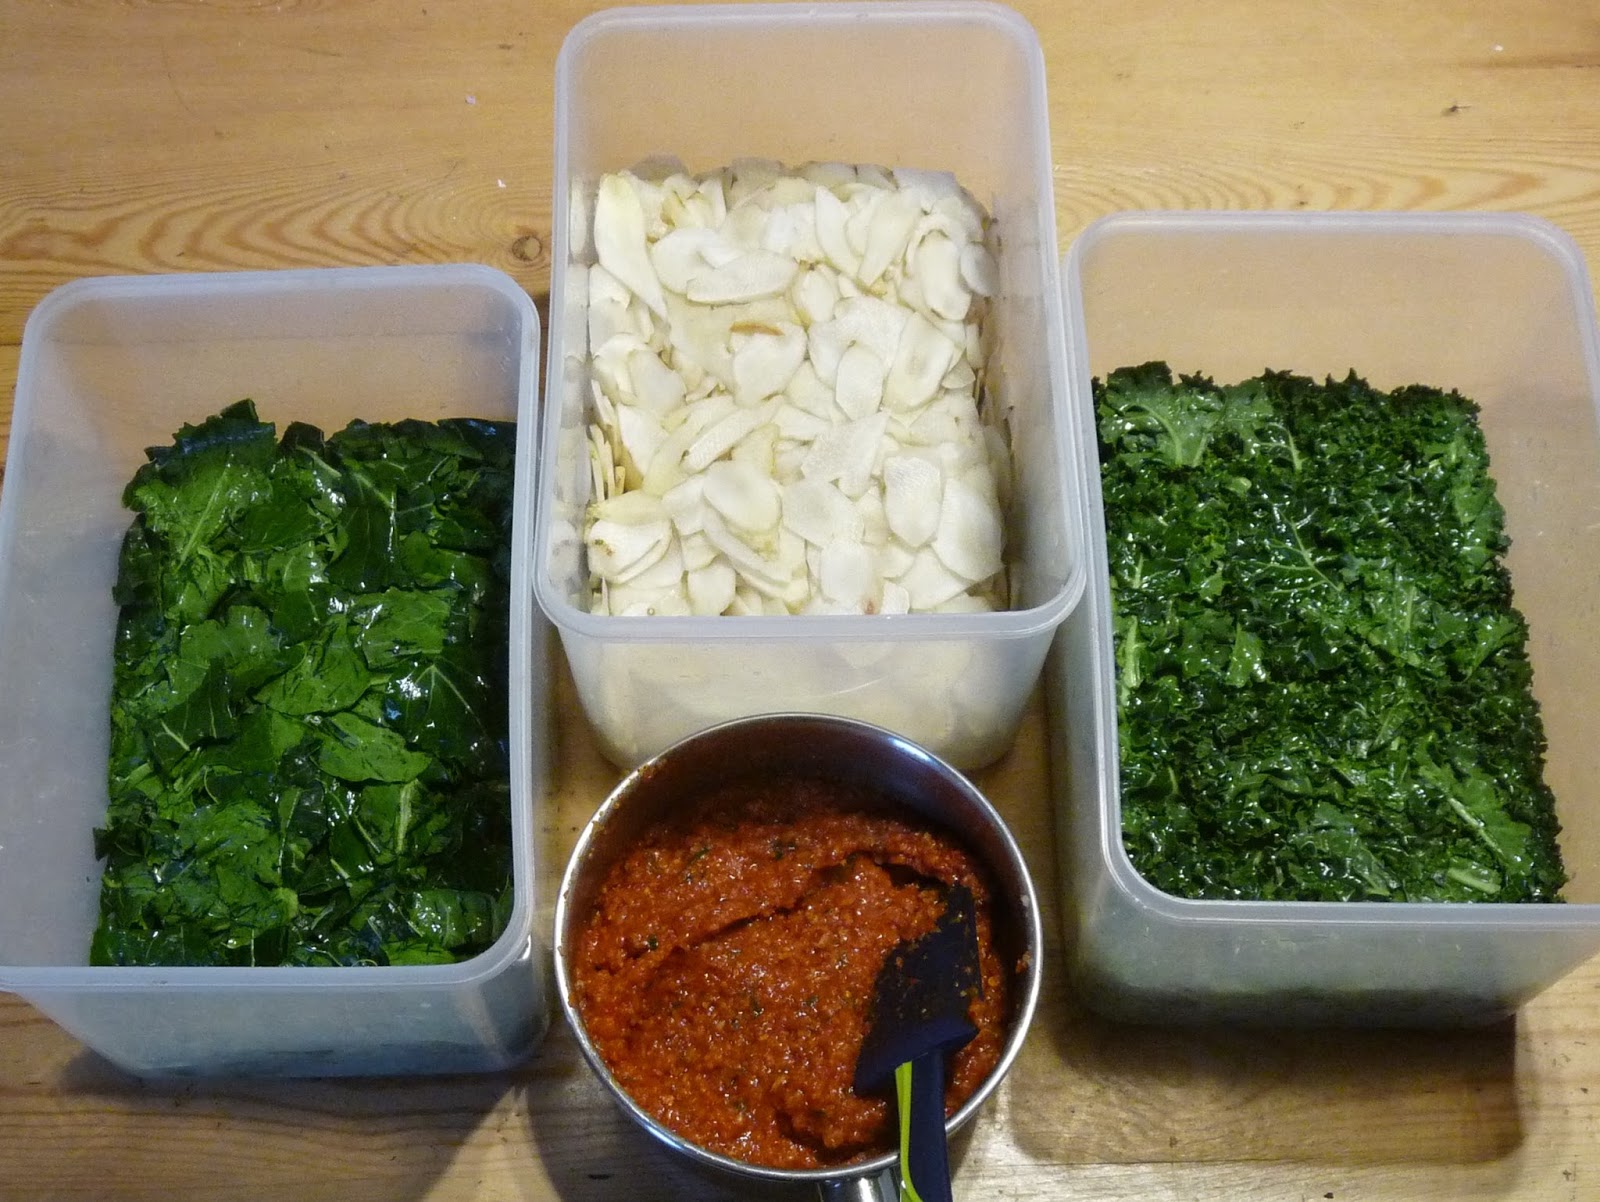
Scottish kimchi

  • Mix of homegrown veggies, some crunchy (such as swede, Jerusalem artichoke, mooli radish, celeriac, turnip, oca, beetroot, carrot), some leafy (such as Oriental greens, spinach, kale, any kind of cabbage)
  • British sea salt
  • Alliums for the sauce: spring onions, chives, onion, plenty of garlic (quantities will depend on your amount of veg, we usually use one onion, one bulb of garlic, about 10 spring onions and a bunch of chives for making about 4L of kimchi)
  • Spices for the sauce: 1 tsp home-made chilli and pepper powder (use none or less if you don’t like it spicy – this will make a ‘white’ kimchi), 1 tsp hogweed seeds, 1 tsp homemade fish sauce (or ½ tsp lovage seeds for vegetarians)
  • ¼ cup Scottish oat flour (milled oatmeal)
  • 1 Tbsp juice from a previous batch (optional)

1. Chop, grate, shred your veggies.
2. Make a salt solution of 1 tbsp sea salt per 250ml and submerge your veg in this brine for 24 hours. Weigh it down with a small chopping board or similar to keep the vegetables covered. After 24 hours, drain well but don’t rinse.
3. The next day, make a porridge from the oat flour and leave to cool.
4. In the meantime, blend your mix of alliums and spices in a mini chopper, food processor or similar. Mix the spice blend into the cooled porridge and add a little juice from a previous ferment if available.

The recipe is very flexible, and you’ll soon get a feel for how much sauce you need. It is a wonderful way to use up vegetables throughout the year and you’ll have ready-made salad in the fridge at any time. We love the energy buzz from fermented foods such as kimchi and usually have a little kimchi snack every day.

Local substitutes

Don’t get hung up about exotic ingredients in your recipes. Most of them can be easily substituted for local ones. All you need to think about is what the ingredient does to the dish. Here’s some substitutes we use:

Lemon:    Japanese quince, lemon basil, juice from seabuckthorn berries, a strong infusion of lemon balm or lemon verbena. Lemon balm is available almost all year round here and grows very vigorously.
Ginger:     Hogweed seeds, which can be easily foraged and dried.
Aniseed:     Wild fennel seeds
Rice flour, corn flour:    Oat flour
Guacamole, hummus:    Broad bean hummus
Rice:    Pearl barley, cracked wheat
Black pepper:     Chopped up Vietnamese coriander
Stock cubes, MSG:     Lovage, leaves or seeds
Exotic beans, soya beans and other dried pulses:    Homegrown bean varieties that work in our climate, the dried or frozen podded beans keep very well – good way to use up a runner bean glut
Cucumber in the winter and spring:     Salad burnet, borage flowers and young leaves
Courgettes in the off season:    Winter squash
Garlic after it’s run out in late spring:     Garlic chives, wild garlic
Vanilla, pandan leaf:     Sweet woodruff, meadowsweet
Saffron:    Dried calendula (though you could grow the saffron crocus here)
Liquorice:    Liquorice mint – in fact, you can replace a lot of things with specialty mint varieties
Exotic nuts:    Hazel and cob nuts
Breakfast cereals:    Porridge – the original and still the best
Sweet potatoes:     Heritage potatoes, sweet and starchy squash varieties
Vegetable oil (contains palm oil), olive oil:    Cold-pressed Scottish rapeseed oil
Wine vinegar:    Cider vinegar, homebrew vinegar
Balsamic vinegar:    Elderberry balsamic

Seabuckthorn berries
Another part of discovering what’s around locally is to go foraging. This could be for mushrooms, wild garlic, elderflowers, hogweed seeds, berries such as brambles, elderberries, bilberries, wild raspberries or seabuckthorn berries, seaweeds such as dulse or various greens, like sea beet or rock samphire. Foraging is a good excuse to go for a walk, if nothing else!

Eating seasonal food can mean less choice, except during the height of summer, but that’s not necessarily a bad thing. Too much choice can be overwhelming and stressful. We tend to have a lot of soups and casseroles in the winter and lots of mixed salads in the summer, but the ingredients vary depending on the month. And a nice leafy garden salad, courtesy of the polytunnel and some hardy outdoor salad plants such as lamb’s lettuce, claytonia and salad burnet, is especially appreciated in the winter months. Go on, cut down those food miles!

Saturday, 13 January 2018

Homebrew vinegar

There's a lot of hype about apple cider vinegar out there, principally surrounding all the amazing health benefits that come with consuming it. No doubt there's a lot of truth to the claims, whether or not you believe the 'hand-waving' explanations of how it works. Getting the good stuff, however, raw and unpasteurised, can be an expensive proposition.

Around a year ago, a friend asked us, "Are you making your own vinegar yet?" Good question! Hadn't really thought about it. Not very much research was required to determine that we already had nearly everything we needed to give it a try.

In the beginning: strawberry wine plus apple cider vinegar

Basic process

Here's the deal: Acetic acid bacteria in a vinegar culture convert ethanol (alcohol) into, yes, acetic acid, which is the vinegary part of vinegar. Some of the cheaper shop-bought stuff is, in fact, just acetic acid mixed with water and possibly some colouring. A true, brewed, vinegar is a much more complex mixture, full of useful vitamins, minerals and those all-important probiotics, reflected in the culture that produces it. A SCOBY (symbiotic culture of bacteria and yeast) is what you want. This is a community of micro-organisms, derived from naturally occurring, wild populations, that work together to ferment products such as kefir, kombucha and vinegar.

Batch 3: apple cider. The SCOBY from the strawberry
vinegar is at the bottom and a new one is forming on top.
An easy way to obtain your starter culture is to invest in a quality bottle of raw, unpasteurised apple cider vinegar. The other key component is something alcoholic. If you're already a brewer of hedge wines or cider: bingo!

To start off our first batch of vinegar, we took two bottles of homemade strawberry wine (so 1.5L), poured them into a 2L bottle, added 1 cup of raw, unpasteurised apple cider vinegar, covered the top of the bottle with a clean cloth, and then left it quite alone for several months.

When next we looked, there was a fine SCOBY at the surface, which appears as a whitish and floppy disc of material. This is then retained for starting further cultures with fresh alcohol.

Using the stuff

Strawberry vinegar, in old malt vinegar bottles.
We bottled up the beautiful strawberry vinegar and started using it immediately. Given how widely apple cider vinegar is touted as a near-miraculous health tonic, we were interested to try consuming our own vinegar in the same way. Most suggest adding a spoonful of vinegar to a glass of water and this is what we now do, several times each day. It makes a lovely, refreshing beverage, with a pleasing tang to it.

As for the health benefits, well, we're both feeling good. I would certainly say that it seems to be very beneficial to the digestion. We also learned that poultry keepers have long recognised the benefits of supplementing their flock's water supply with a little brewed vinegar in their water supply. Our hens were just coming out of a heavy moult, had been off the lay for over a month and certainly looked as if they could do with a tonic. Within a month, and just at midwinter, they came back into lay. Coincidence? Who knows, but they certainly love their tonic and we're keeping it up - 1 tbsp into their 2L drinker daily. In case you're wondering if they drink that only because they have no choice, don't worry - they have several sources of water, including a small stream that flows through their area. They practically queue up to get to the tonic when it's put out.

We have since brewed a batch of gorse flower vinegar, also delicious, and have another batch of apple cider vinegar brewing now, from homemade cider. One advantage of brewing the vinegar from wine, as opposed to cider, is that you get a stronger vinegar (more alcohol = more acetic acid), which is useful if you wish to use it for pickling (minimum 5% acetic acid required).

Particularly if you're already homebrewing anyway, give this a try. The absolute deliciousness of homebrewed vinegar has been a revelation to us.


Monday, 13 November 2017

Processing apples

Harvest from one of our 12 trees
This year we had our first proper apple harvest, which prompted me to look into storing them for eating fresh through the winter. In a nutshell, I learnt that late-season apples are the best bet for storage and found out that hardly any of our apple varieties store well at all. So, Plan B: process them all before they were past their best, which turned out to be by early November for the two varieties with the best keeping qualities. We've now discovered that we actually prefer the apples in their processed forms rather than fresh, which is just as well.

We made every apple thing we could think of:
  • Dried apple rings
  • Apple sauce
  • Apple ice cream
  • Fruit leathers
  • Apple jelly
  • Apple wine
  • Cider
  • Cider vinegar
  • Apple cordial
  • Apple crumble (or pie)
  • Baked apples.

I forgot about apple butter, which is on the agenda for next year. Apart from the cider, everything turned out absolutely delicious. The cider is OK, but probably best mulled or turned into vinegar. Next year, wine or cordial only!

First off, I'd recommend the following equipment for speedy processing of apples:

  • steam juicer
  • electric dehydrator
  • apple corer
  • mandolin slicer.
Rosehips and apple thinnings in the steam juicer

I don't peel any of my apples - life's too short and there's all sorts of goodness in the skin. To separate the apples into juice and pulp, simply fill the steam juicer with your apples (zero processing needed) and steam for 90 to 120 minutes. Steaming times will depend on the apple type (one cooking variety took just 60 minutes to break down completely). Drain the juice (usually around one litre per fill) and reserve for further processing into jelly, wine, cider or cordial. Then mash through as much of the remaining pulp as possible. This results in a very fine apple sauce, which can form the base of fruit leather, ice cream or simply be bottled or frozen as apple sauce. Any few remaining bits left in the top of the steam juicer are gratefully received by chickens (if you have any) or can be composted.

Dried rings

Apple ring central
This is a great way of preserving apples. The dried rings are lovely to snack on and can also be used in baking throughout the year. Our main use for them is in our morning porridge, where they reconstitute into apple bits. Since we don't buy any fruit, I made 17 large jars of these, which will hopefully last us until June when the new season strawberries will be ripe.

To make apple rings, core the apples and mandolin slice to about 4mm (just under a quarter inch) thick. To prevent discolouration, dip into water with a little citric acid or lemon juice before dehydrating. Lay out the apple rings on your dehydrator trays so that they're not touching and dry at around 60°C/140°F. Drying times will vary depending on the dehydrator and your atmospheric conditions (anything from 4 to 10 hours) - best to check every hour from about the 4 hour mark and remove the rings that are dry. They should be leathery, but not brittle, and not show any signs of moisture when cut. Let them cool for 5-10 minutes and immediately store in an airtight jar.

Apple sauce

A very versatile and efficient way to store apples. You can either freeze it or bottle/can it (using the water bath method or heat the filled preserving jars in the oven at 170°C until bubbles start to form). Either use the puree from your steam juicer or core and mandolin slice 20-odd apples and cook on low heat with a little sugar, plus raisins or spices such as cinnamon or ginger, if desired. The sauce itself makes a lovely dessert, served on its own or with cream, creme fraiche or ice cream, or can be used as a pie filling at a later stage.

Ice cream

Follow our recipe for strawberry ice cream, but substitute the strawberry puree with fine apple sauce (from the steam juicer) and a generous pinch of cinnamon. This is one of the most delicious ice creams ever and we don't know why this isn't a known flavour.

Fruit leathers

Apple and quince fruit leather
The big discovery of the autumn. Wonderful, healthy snacks and fun to make! Simply make an apple sauce, add sugar, spices (cinnamon, ginger or chocolate are good) or other fruit of your choice (mash in quinces for a bit of zing or autumn raspberries, for example). Spread about 0.5cm thick on a piece of silicone sheet, plastic liner or similar and dry either in the dehydrator at 60°C/140°F for about 8 hours (scrape off the sheet about halfway through and place directly on the dehydrator mesh trays) or on the lowest setting on your oven (usually around 70°C). Leave to cool, cut into handy sized pieces with a pair of scissors and dust with icing sugar so that the pieces won't stick to one another (also looks nice). Store in an airtight glass jar.

Jelly

A good way to use up some of the apple juice from the steamer. Apple is good in a jelly combined with rosehips, elderberry or infused with rose geranium.

Wine

Follow our recipe for hedge wine using the juice from the steam juicer. Try adding some rosehips, brambles, elderberries or blackcurrants to the apples in the steam juicer for a nice blend of flavours. These wines can also be used to make vinegar at a later stage (see below). In my opinion, apple wine is one of the best homebrews, delicious hot or cold.

Cider

Small batch of cider
Since we didn't know anyone with a cider press to make cider the traditional way and didn't want to invest in one, I used the ready-sterilized juice from the steam juicer. It was quite a lot of work, running the steam juicer five times to get five litres of juice for a small batch, but at least I got plenty of by-products for making fruit leather! The result is rather tart, but hopefully bottle conditioning will improve it - we added a little sugar at bottling stage to carbonate it. Otherwise it will all go into vinegar production.

Vinegar

To make vinegar from cider or wine, you need to add some 'mother' culture to your alcohol to convert it to acetic acid. You could just leave the cap off your bottle, tie over a clean rag and hope for the best. However, for surer results and to speed up the process, add a cup of unpasteurised cider vinegar to your alcohol for your first batch, then tie over a clean rag and store it in the dark for at least a couple of months before straining it and feeding your resulting gloopy 'mother' with some more hedge wine or cider.

Cordial

Hot fruit cordials are a real delight in the cold days of late autumn and winter. Again, it's nice to combine the apples with rosehips, elderberries or blackcurrants for this. Once you've extracted the juice, add sugar to taste (usually 100-200g per litre) and then bottle/can for long-term storage. I'd err on the side of too little sugar, since you can always add a spoonful of honey to your hot cordial when you're diluting it with hot water. Unfortunately, I only made five half-litre bottles of apple & rosehip and apple & elderberry cordial this year and we're already on the last bottle. Next year, there will be a lot more of these.

Apple crumble (or pie)

Apple berry mix waiting to be crumbled
I'm usually too lazy to make things as involved as pies, but am happy to make a crumble every day! Core and slice the apples (with a mandolin slicer if you wish) and layer in an oven-proof dish. Sprinkle over 2-3 tbsp of brown sugar, depending on the tartness of the apples. Cover with a crumble mixture (100g flour, 50g sugar, 50g soft butter, a little bran if desired) and bake at 175°C/350°F for about 35 minutes or until crumble goes golden brown and apples are soft when pricked with a fork. Serve with creme fraiche, cream or ice cream.

Baked apples

Core the apples, stuff with dried fruit and chopped-up nuts of your choice, bake until they split and are all soft inside. Sprinkle over sugar mixed with cinnamon and serve with custard or double cream.

That's all our apples used up! And we now have a good system in place for efficient processing next year.


Thursday, 24 August 2017

Brew your own hedge wines

Crab apple wine for dessert
Rosehips and apples in the steam juicer
Making your own booze from foraged or garden fruit is simple and rewarding. A good hedge wine is no substitute for a good red wine - but it definitely has its own place in the drinking panoply. Often home-made wines are quite sweet and make nice dessert wines. Tart wines are good for cooking with and for turning into home-made vinegar. Both tart and sweet hedge wines make wonderful mulled wine. On a chilly wet night, hot fruit wine is the ultimate comfort drink. Just add sugar to taste while you're heating up the wine. We haven't bought any cheap red wine for making mulled wine or cooking with since we started brewing our wines.

People make wine from just about everything, even pea pods and rhubarb. We've experimented quite a bit over the past four years and we find some are worth the effort and others not. We haven't tried rhubarb but suspect it might fall into the 'probably not worth it' category. Some flavours are good to mix (rosehip with apple, for example).

Probably not worth it

  • Pea pods: This has been described as similar to Riesling - obviously by someone who never tasted actual Riesling! It's wine that tastes strongly of peas, which made it brilliant for cooking risotto with, where it added a pea flavour to the rice.
  • Gorse flower: A pain to pick! We'd been hoping for something with a hint of coconut. Instead we got a bit of a rough sherry. Again, good for cooking only.
  • Carrot: There are much nicer ways to consume carrots!

Bramble wine

Well worth it

  • Rosehips
  • Elderflower
  • Elderberry
  • Crab apple
  • Apple
  • Plum
  • Gooseberry
  • Bramble
  • Combinations therof

Drinkable

  • Parsnip
  • Strawberry

Ready for bottling

How long does it take?

We usually start our 5-litre batches in a large plastic bucket, rack (i.e. transfer) them into a demi-john with a fermentation lock after about a week, then rack a couple more times over the following six months. After about six months, we bottle. Ideally, you'd then leave the bottles for another six months and start drinking your wine exactly a year after starting the process. In reality, we start drinking them soon after bottling, safe in the knowledge that some of them are going to continue maturing.

What equipment do you need?

Our recommended list would be:
Fermenting in the demi-john
  • Steam juicer: a very easy way to get juice from your fruit.
  • Oxygen steriliser powder: to sanitise your equipment.
  • Hygrometer: to measure the specific gravity of your wine. This tells you how much sugar you need to add and how strong your wine is going to be, if fermented to completion.
  • Large plastic bucket with lid: to start the ferment. Ideally this should have a scale on it and it's very useful to add a thermometer strip on to it so that you know when it's ready to add yeast.
  • Wine yeast
  • Demi-johns: you'll need quite a few of these.
  • Rubber bungs with fermentation locks, to fit your demi-johns
  • Racking cane
  • Syphon hose
  • Bottling wand
  • Empty bottles, ideally with reusable stoppers or screw caps
  • Optional: Campden tablets and finings

A little sample after bottling

The process

Making hedge wine is much simpler than brewing beer. We follow this straightforward procedure:

  1. Steam the fruit for 90 to 120 minutes in the steam juicer.
  2. Meanwhile, sterilise your plastic brewing bucket, a large wooden spatula and a small measuring jug.
  3. Pour the hot juice into the plastic bucket. It should be about 1 litre of concentrated juice.
  4. Add 1kg of sugar and stir well with a large wooden spoon to dissolve the sugar in the juice.
  5. Top up with cold water to the 5-litre mark and stir again.
  6. With the measuring jug, take a sample of the liquid and measure the specific gravity in your hygrometer. Add more sugar if needed. We usually aim for a specific gravity of 1080. Taste the sample for interest's sake.
  7. When the temperature of the liquid drops to about 24°C, add 1 tsp of wine yeast. Stir and loosely pop on the lid.
  8. Leave to ferment at room temperature for a week or so. You'll see that it's fermenting by the 'foam' appearing on the surface and the sediment forming on the bottom (and by the tasty smell).
  9. Sterilise a demi-john, rubber seal, fermentation lock, racking cane and syphon hose.
  10. Syphon the wine from your bucket into the demi-john, taking care to leave most of the sediment behind.
  11. Leave for a couple of months, rack again, leave again, rack again.
  12. After about six months, fill into sterilised bottles. A bottle wand, though not strictly necessary, is extremely useful for this as it makes it easy to stop and start the procedure with each bottle.

Cheers!


Wednesday, 16 August 2017

Coping with a courgette glut

The courgette-marrow spectrum
Layering veg for a crustless quiche

Half an hour later
Spot the yellow flecks of courgette
Young courgettes, ideal for the BBQ
And then there's the flowers to eat as well
First piece of advice: pick 'em small. I like to pick ours at roughly half the typical supermarket size (as at the far end of the courgette spectrum on the right). At that stage, the courgettes are so tender and tasty that they can be chopped raw into salads. It's a lot easier to deal with 20 small courgettes than with 20 marrows. This typically means daily picking, so if you're only visiting your courgette patch on the weekends, it's marrows for you! If you grow yellow varieties the fruit are a lot easier to spot and you won't get as many hiding and making it to marrow size.

If you do end up with marrows, my favourite recipe is spicy fried marrow rings:
Cut the marrow into 1cm-thick discs and press out the seeds with your fingers, making rings. Mix 3tbsp of flour with 1tsp coriander, 1tsp chilli powder and 1/2tsp salt. Dip the marrow rings into the flour mixture on both sides and fry in vegetable oil until the flesh is soft and the outside crispy on both sides. Serve with yoghurt or creme fraiche.

Other marrow options include stuffing with mince, making marrow jam (surprisingly tasty though not quite a substitute for a good berry jam) or using it as part of a piccallili pickle mix.

However, I do prefer courgettes before they get to marrow stage. Then my currently preferred recipe is to turn them into a crustless quiche, which is a simple and super tasty way of using up whatever you've happen to have in the garden:
Butter a pie dish and layer with vegetables. Start with a layer of onion slices, followed by sliced courgettes (peas, broad beans, chard and broocoli are also very good in this) and some chives. Mix 250ml cream with 4 eggs, season with salt and pepper. Pour over the layered vegetables and top with grated cheese. Bake for 30 minutes at 170°C. Serve hot or cold.

Courgette cake is a fun way to use courgettes, though not necessarily a good glut coping strategy, since you only need one or two per cake. Here's an easy courgette bran loaf, which is our standard elevenses bite. It's not very sweet and best served with butter and homemade jam. If you make it often enough (we get through one every two days) you'll eliminate a fair number of courgettes.
Mix together 1 cup wheat bran, 1 cup sultanas, 1/4 cup brown sugar and 1 cup milk. Leave to stand for an hour. Then add 1 cup wholemeal flour, 1tsp bicarbonate of soda, 1/2 cup grated courgette and 1 egg. Mix and spoon into a greased loaf tin. Bake for 45 minutes at 150°C. This is a very flexible cake. You can use grated carrot or beetroot instead of courgette or 1 cup of berries such as currants, blueberries or raspberries.

Another good way of eating young courgettes is as the original vegetarian sausage. Rub with vegetable oil, salt, pepper and herbs, wrap in foil and toss on the barbecue. Or dip in beer batter (100g flour, 1tsp ground fennel seeds, 1tsp chilli powder, 1/2tsp salt and enough ale to make up to double cream consistency) and pop into the deep-fat fryer.

Then, of course, there are all the usual Mediterranean recipes that you can throw courgettes into: risotto, lasagne, ratatouille, bolognese sauce, carbonara sauce etc. And you can even make a tasty sandwich spread from courgettes.

Possibly the best way to use up a lot of courgettes in one go is to make relish. This is very useful stuff and keeps well, too.

Whatever you do, don't freeze your courgettes, raw or blanched (though cooked, in a dish such as ratatouille is fine). The texture goes all rubbery. Some people dry their courgettes in thin slices - I tried this once but didn't find the result particularly appetising or useful. However, I'm willing to try again if someone suggests a good way of using the dried courgette slices.

If you still have any courgettes left over, give them to friends, family and passers by. People are usually delighted to receive them - unless they have a glut of their own to deal with!

Tuesday, 4 July 2017

June round-up

Dunluce earlies, eagerly awaited
Strawberries 'Symphony'
June is when the new season harvest starts properly, with outdoor broad beans, mangetout, beetroot, shallots and the first of the new pototoes. The latter were especially eagerly awaited, since we ran out of main crop potatoes in March, due to a smaller than normal harvest last autumn because of blight. This year, we're growing extra potatoes to compensate for any outbreak of potato blight, and three types of blight-resistant maincrop spuds (Blue Danube, Sarpo Axona and Setanta).

Fruit wise, the strawberries got going very early this year, in mid June when we often don't have any until July. We've been having them daily in our morning porridge, made delicious strawberry ice cream and sorbet and possibly our favourite jam, strawberry conserve. 

To make conserve, layer the whole hulled strawberries in their weight in sugar in a non-reactive pan, cover with a towel and leave for 24 hours. Then boil for 5 minutes, cover and leave for another 24 hours. On the third day, add the juice of a lemon per kg of strawberries (or 1/2 tsp citric acid) and make jam as normal. Worth the wait - this jam is basically spreadable whole strawberries, an intense flavour.

The 2.5-year-old hedge
We've planted more hedge every winter so far, about 1000 plants to date. And this year the 3.5- and 2.5-year-old hedges were ready for their first trim! It's wonderful to start getting real shelter from them and birds and pollinators love them too. On our outer perimeter we've chosen spiky hedge plants such as hawthorn, blackthorn, sea buckthorn and rosa rugosa, to deter browsing by cattle and, eventually, deer. But for our internal hedges we've opted for variety, edibility and wildlife-friendliness, with hazel, crab apple, wild pear, elder, alder, poplar, willow, guelder rose, field maple, purple and green beech, forsythia, cotoneaster and dog rose, plus a few of the thorny types as well (after all, they all have edible fruit).

Wind protection for the squashes
The first Tigerellas of the season
Fuzz and the gang
Broad bean hummus on sourdough rye
Unlike our southern neighbours in England, we have not had a heat wave in June - unless four days above 22°C counts. Instead, we've been having a wet and windy old time, with the Rayburn back on for quite a few days. The wind has wreaked havoc with our squashes: 11 survivors out of 36 and only because Jim had the bright idea to shield the remaining plants with old car tyres. Next year, all squash seedlings will get a tyre - I'm sure our local garage will be only too happy to offload some for free.

At least, the cucumbers, chillies and tomatoes inside had no idea what nonsense went on outside and have been ripening away. As usual, Gusto Purple and Hungarian Yellow Wax were the earliest chillies. The Femspot cucumbers have been amazingly early, with the first one ready in the second week of June - definitely will be growing these again! The tomatoes too have been early and we had ripe tomatoes in June for the first time ever. The first three varieties were Matina, Tigerella and Harzfeuer, all now slotted to become regulars.

The chicks are two months old now and have free range of the chicken area. They don't mix with the older chickens but wander everywhere in their tight-knit group of five. They enjoy the foraging immensely and sometimes it's a chore to get them into their hut for the night. Unlike the senior chickens, they don't seem to realise that dusk is bed time! One of the two young cockerels looks as if he has fur instead of feathers - I just want to stroke him, but he's rather shy. With his unusual plumage, we might just have to keep young Fuzz for breeding (bad news for his dad, Feathers).

Apart from jam and ice cream, we've also tried making some new healthy snacks, including sourdough crisp breads and broad bean hummus, which is a great combination. The broad bean hummus is wonderful and so easy to make: Boil the broad beans for 5 minutes, drain, add some cold-pressed oil, garlic, lemon basil, salt and pepper and blend into a paste. Who needs avocados?

Tuesday, 6 June 2017

Homemade ice cream

Pure homemade vanilla and rhubarb deliciousness.
Although most people would probably find it a bit of a stretch to consider ice cream as one of life's essentials, it is undeniably a very, very nice treat.

Imagine, then, the nicest ice cream you've ever tasted: smooth of texture, rich in flavour, pure of ingredients, but small of cash outlay. Add to that the satisfaction of having made it yourself and you have a very compelling case for acquiring an ice cream maker. There are many to choose from. Consider your budget and read around some online reviews to help narrow the field.

Elderflower sorbet, for a change.
After toying with the idea now and then for years, our minds were made up when we tried a friend's homemade ice cream. It was a revelation. She has a very simple ice cream maker, with no moving parts (you use a hand blender to do the mixing), so we decided it was time to do the same.

We bought our ice cream maker second-hand on eBay, and it even came with a Ben & Jerry's recipe book, a very useful bonus. It was from that book I learned just how simple the ingredients of quality ice cream actually are (eggs, sugar, cream and milk) and, in fact, how straightforward the whole process is. Once you get a bit of a feel for it, branching out into adapted or altogether new recipes is a natural step.

Every flavour I make starts with almost exactly the same base mixture:

Base mixture

  • 2 large eggs: beat with a hand blender until they are very light and fluffy, pale yellow in colour.
  • ¾ cup (for coconut) to 1 cup (for chocolate) caster sugar, depending on the recipe: add gradually to the eggs, beating to dissolve.
This egg-sugar mix should be like a smooth and thick custard in texture by the time you are finished.
  • 1½ cups of double cream: blend this into the egg-sugar mix.
Next comes the individual flavour. I've developed my own recipes for seriously nice coconut ice cream and chocolate ice cream:

Nearly ready.

Coconut ice cream

  • 1 very heaped tablespoon of pure virgin coconut oil: melt this in a small pot on a very low heat.
  • Add to it 1 tablespoon of desiccated coconut.
  • Keep back a little of the cream that would have gone into the base and add it to the coconut oil, whisking all together.
Once all that has had a bit of time to infuse, add it to the base mixture, whisking or blending vigorously as it goes in. Top up to 1 litre (1 generous quart) with milk. Chill the whole mixture in the fridge for a few hours and then follow the instructions for your ice cream maker.

Raw chocolate ice cream

Choc ice, ready for the freezer.
  • 50 g (2 oz) butter: melt in a small pot on a very low heat.
  • 1 tablespoon pure virgin coconut oil: add to the butter.
  • Gradually whisk in ½ cup of raw organic cacao powder.
  • Add a ¾ cup of hot milk, to thin the chocolate mixture down so it won't solidify as it cools to room temperature.
Let the chocolate mixture cool off a bit and then add it, plus 1 teaspoon of good quality vanilla extract, to the base mixture, whisking or blending vigorously as it goes in. The volume should now be near 1 litre (one generous quart), but top up with milk as required. Chill and then run it through your ice cream maker.

Strawberry ice cream

Strawberry delight
This one is a special summer treat.
  • Sprinkle ¼ cup of sugar over 1 pint of freshly picked ripe strawberries and store them in the fridge for a couple of hours. Then blend this into a smooth puree, with a dash of balsamic vinegar.
  • Prepare the base mixture, as above, with ¾ cup sugar.
  • Add 1 teaspoon vanilla extract.
  • Add as much of the strawberry puree as it takes to make the total volume up to 1 litre.
Chill the mixture and then use your ice cream maker to transform it into the finest strawberry ice cream you've ever tasted.

Once you have an ice cream maker you can also easily branch out into sorbets, which are a great way of using up berries. Here's a couple of lovely seasonal sorbets to try for starters:


Elderflower sorbet

Once you have elderflower cordial, homemade or otherwise, turning it into sorbet is ridiculously easy:
  • Dilute 1:1 with cold water.
  • Chill, and into the ice cream maker with it.

Strawberry sorbet

  • Blend 4 cups of strawberries with 1 cup of sugar and a dash of balsamic vinegar.
  • Chill, and put into the ice cream maker.
If these homemade treats don't astonish you, your family and friends, I will be very surprised.


Wednesday, 15 March 2017

Crisping vegetables

Fried to golden perfection.
One thing I determined on when we settled here on our homestead, far from the horrors and conveniences of city life, was that we'd have to get a deep fryer. Chips (fries, for American readers) are just something that I have to have from time to time and the prospect of making them from our own super tasty home-grown spuds was irresistible. Oven chips weren't going to cut it either. There's simply nothing to beat the thick cut chip, deep fried in beef dripping to pure, golden, crispy on the outside, soft and mushy on the inside perfection.

A deep fryer built for two.
The main thing that had always put us off acquiring a deep fryer was the difficulty of dealing with the litres and litres of spent oil that would be generated as a by-product. Switching to dripping as a frying medium is a big help with this, as you can re-use it many more times than vegetable oil, which accumulates hazardous compounds with repeated use.

Dripping is also solid at room temperature, so it can easily be put out for the wild birds to enjoy, thus saving even that from going to waste. The other big fat saving was achieved by tracking down the smallest fryer we could find, which takes only one litre of fat and is the perfect size for two.

Mandolin-sliced potatoes, ready for frying.
So, yes, the chips are fantastic and I feel more than adequately compensated for the lack of a fish & chip shop to call in at on the way home from the pub for a steaming portion of deliciousness, but now I come to the point of this post: The deep fryer is for much more than chips and potatoes. In fact, this last winter we've used it much more for making crisps (chips, for American readers). Potato crisps, to begin with, and latterly branching out into more adventurous vegetable crisps, like celeriac and Jerusalem artichoke.

Celeriac crisps
Back in our seafaring days, we'd sat in a tiny cafe up a Galician ria, in northwestern Spain, and watched the proprietor hand-frying potato crisps for us to have as a little snack with our glasses of beer. A seed was planted. I knew it could be done. What I later discovered is that it can only be done if you have a mandolin slicer. Now I don't know how life was possible without one.

Out of the fryer: blotting and seasoning.
So, here's the deal:
  • Scrub (and possibly peel) your vegetable of choice (potato, celeriac, Jerusalem artichoke, parsnip, beetroot, what have you). 
  • Thinly slice (1 mm), with your mandolin slicer (and WATCH your fingers as you get to the last bit). 
  • Wash, pat dry, and batch fry them at 190°C. For less starchy, more watery items like the Jerusalem artichokes, brine them overnight or for a day to draw out some of the water before drying and frying. 
  • Blot and season while they're still hot and prepare your taste buds for a real treat. You'll be ruined as far as store bought vegetable crisps are concerned. There's really no comparison. And you know there's no mystery ingredients, only the best of stuff.
Jerusalem artichoke crisps

There's even a bonus item: massive cost saving! A couple of modestly sized potatoes are plenty to make a good evening snack for two. That's seriously cheap entertainment, compared with bought snacks of dubious ingredient lists.

Sunday, 5 March 2017

The Kimchi Experiments

Kimchi paste with three kinds of brined veg
When we visited South Korea back in 2001 we loved the variety of little kimchi dishes that came with every meal. In fact, we didn't really care what the main course was (slight exaggeration, but you get the idea) - the highlight of our meals were all the side dishes. Unlike in the West, where kimchi is synonymous with Chinese cabbage, in Korea they preserve all kinds of vegetables in this way. We had fermented vegetables there that seemed like turnip, spinach and nettle, though they may have been some other local vegetables. So, since Chinese cabbage would only grow in a polytunnel here (and that would be a waste of space!), we've decided to experiment to see which of our abundant, easy-to-grow veg would make the best kimchi.

So far, we've kimchi'd the following:
  • Jerusalem artichokes
  • Oca
  • Swedes
  • Winter cabbage
  • Broccoli leaves
  • Kale
  • Mooli radish
  • Chard
  • And combinations thereof.
The all-important paste

We always follow the same method:
  1. Slice the vegetables with a mandolin or chop up finely.
  2. Brine them for a day (1 level tbsp sea salt per 250ml) - this helps preserve crunchiness.
  3. Make the spice paste, always to the same recipe, erring on the side of more garlic and ginger and using an MSG-free anchovy extract.
  4. Drain the veg and massage in the spice paste.
  5. Fill into preserving jars (we use Weck) and really pack down so that the liquid covers them and all air is excluded. Make sure to leave a good air space at the top (2.5cm/1 inch), to allow for expansion during fermentation, and put on a plastic lid (this is not totally air-tight, but I still lift the lids a couple of times a day to release any pressure).
  6. Leave for 5-7 days. Sample and put into the fridge when you're satisfied with the taste. The kimchis will continue maturing slowly in the fridge.
Swede and chard kimchi, a good combo

The results of our kimchi trials:
  1. All vegetables react differently to the fermentation. The smell and taste were different for each veg. The Jerusalem artichokes were the most vigorously fermenting.
  2. All kimchis were perfectly edible, though the broccoli leaves and kale were better for use in cooking than for eating straight-up.
  3. Mixtures of veg are a good idea, especially combining a sweet veg, like Jerusalem artichokes, with a green, such as kale, chard or cabbage.
  4. This could possibly be the best way to eat swedes.
  5. The nicest kimchi for straight-up eating was oca! Now that's what I call fusion - Korean recipe using South American tubers. Radish and swede/turnip were also extremely good, as was the winter cabbage.
  6. Greens, like chard and kale, are quite bitter on their own. They are best combined with another vegetable.
  7. Kimchi makes a great fast food. The quickest and easiest lunches in our house are now egg-fried kimchi rice and kimchi omelette. We also use our own kimchi to make Korean dumplings, mandu. For the filling, simply fry up some mince with the kimchi of your choice.
A portion of mooli radish kimchi

Since travelling can be a bit of a challenge when you're growing your own veg or running a smallholding, it's very reassuring that you can simply make these foods at home and have the taste of Korea without physically having to travel there. We now make all our favourite street foods from when we visited Korea, including mandu and hotteok. Thanks to the internet, the secrets of all international cuisines are at our fingertips. And they're great with home produce.


Saturday, 25 February 2017

February round-up

That's the autumn raspberries pruned
Frost flowers on the polytunnel
OMG celeriac crisps
Our wildlife pond
Cloches for early sowing
February is the month for pruning, other than cherry and plum trees. The easiest fruit to prune is the autumn raspberry: simply cut it back to the ground. Just as well with the number we have! The other fruit bushes such as blackcurrants and gooseberries are a bit more involved and I had to look up how to prune the goji berries for the first time: apparently an umbrella shape is what's wanted. I stuck about 100 cuttings into the ground as part of the pruning process, just to see what'll take, as well as some Siberian blackcurrant cuttings given to me by my uncle.

February has been the coldest month so far, with several frosty nights. We even had some frost flowers on the polytunnel - a first! Still, the cold hasn't held back the rhubarb or the daffodils.

We've used the cold and windy days to do a lot of food processing: another seven litres of kimchi are fermenting and several litres of ice cream made from local milk (vanilla, eggnog, chocolate and rum & raisin flavours) are chilling in the new freezer. It's nice to be able to all this processing at this time of year rather than in the summer and early autumn.

Another culinary highlight of the month has been our discovery of celeriac crisps. At least as delicious as potato crisps! Luckily we still have a dozen whole celeriacs left. Even more will be planted this year.

The pond area has had a full work over, with quite a few irises removed, and the frogs and toads obligingly deposited loads of spawn on 17 February. We also managed to clear the remaining bramble wilderness behind the pond and plant a rosa rugosa hedge with suckers from our existing plants. This means perimeter hedging is now complete.

But there was even more hedging to be done. A change in SEPA farmland regulations means that watercourses have to be fenced off from livestock so our neighbouring farmer fenced off the burn on the southern perimeter of our land. He gave us permission to plant in this strip - so in went 100 or so willow cuttings and some more rosa rugosa suckers. This is great news for us: Not only won't the cattle nibble on our hedge any more, we can also create double or triple hedging to the windiest side and create a nice wildlife habitat at the same time.

The new growing area, for this year's potatoes

After the hedge planting it was time to turn to digging. We moved the first bit of black plastic in the bottom paddock to start on this year's potato area. The soil looks good underneath, if a little heavy and several voles, who had a cosy environment beneath the plastic, scurried away. This time we are going to remove the plastic bit by bit so that weeds don't start to sprout again before Jim can get to the digging. I've started aerating the soil with the broadfork to help it dry a bit before digging commences. In the meantime the potatoes are chitting. The earliest we can plant them is last week in March, weather permitting.

Splitting wood - a regular workout


Wood processing continues when the weather is favourable. We're thinking about the best way to construct more permanent log stores. The split wood that we've stacked outside in between stacks of tree disks and roofed over with polycarb sheeting (weighed down by fish boxes full of stones) has dried much better than that in the wood shed. So we'll likely make permanent shelters next to the garage first, before tackling the shed.

Conservatory filling up with seedlings

When it comes to seed sowing, it's a real patience game this month. We don't want to sow things too early. Tomatoes, chillies and peppers, for example, will have to wait until the first week in March. Otherwise they just get too spindly before it's warm enough to plant them out into the polytunnel and greenhouse. However, there has been some early sowing of seeds: leeks (three varieties, colour-coded - the earliest variety is yellow), pak choi, lettuce, tatsoi, spring cabbage, beetroot and cauliflower. And since the weather has been mild, we also sowed some crops under cloches and in the polytunnel: shallots, hardy carrots, rocket, red mustard, radish, kohlrabi and more beetroot. Not long to wait now until the tomatoes get sown!