Showing posts with label Fruit growing. Show all posts

Tuesday, 10 April 2018

Setting up for self-sufficiency from scratch

Broadforking a large new vegetable bed
Chatting with a friend who's just about to start working a croft has focused my mind on how I would set up our veg garden from scratch if I had to start over again and what I'd consider essential in a veg garden. We've worked these things out over several years and have implemented the suggestions below, but we could set up even quicker, with what we know now.

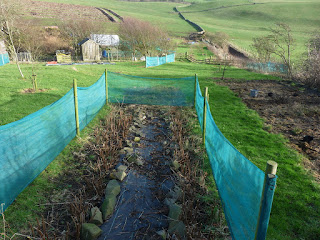
First of all, I'd identify the sunniest, best drained land by walking the land at diffent times in different conditions, like after heavy rain (be aware that light levels might quite different in winter, but spring to autumn levels are really the most important since that's mainly when you're growing). If it's sheltered as well - super. Otherwise hedge planting has to be top priority - put in a temporary windbreak fabric fence until the hedge is established (about three years). If it's reasonably level ground - even better, but you can work with terracing. It should also have easy access to water for watering (not so crucial in Scotland, but elsewhere it could be). If it's downhill from the house you can easily collect rainwater from your roof to water your veg.


Vegetables and herbs


Last year's squash bed
Raised beds
Part of the large herb garden
This area will eventually be totally
given over to perennial veg
Then I'd make a plan for four large vegetable beds (about 4m x 20m, scaled appropriately if you have less space) for the large crops: potatoes; onions, garlic, leeks and carrots; brassica; and a three sisters bed - courgettes and winter squashes with beans and sweetcorn (if you're lucky enough to live somewhere warm enough where these will grow outdoors - for us it's just squash). This makes it very easy to keep track of crop rotation, which can be a challenge otherwise. To minimise work I'd put down black plastic for a minimum of six months where these beds are going to go. This kills all the grass and weeds underneath and makes preparing the ground a lot easier.

If you think your ground is suitable consider no dig, in which case you can use cardboard as your base layer and top it with compost and organic matter. This uses a lot of compost, however, so think about cost implications. I'd advise trying to dig in several spots first, to see just how stony the ground is and what drainage is like. Much of our ground was very stony and drainage needed to be improved so no dig will have to wait. On the other hand, if your ground is too stony to do anything with, possibly the best way is up: making huegelkultur beds on top. That is, if it's not too windy to go upwards! We ended up making an underground huegel in a particularly wet part of ground.

In addition to the four large beds, I'd have a dozen raised beds for lettuces, salad leaves, beetroot, chard and crops that do better in raised beds such as celeriac. These beds don't have to have permanent structures; they can just be created by mounding up the soil. In this area there also needs to be space for an easy to move pea fence or trellis.

Somewhere near the house, I'd set up a herb garden with lots of perennial herbs and some annuals. This would also incorporate edible flowers, wild flowers and medicinal herbs (often the same plants!).

Next on the agenda would be an area dedicated to perennial vegetables, with some luxury crops such as globe artichokes and asparagus, some great staples such as Daubenton's kale, Good King Henry and a few varieties of perennial onions and some of those tubers that keep on coming like Jerusalem artichokes and oca.

The last of the winter crops and
the first of the spring crops
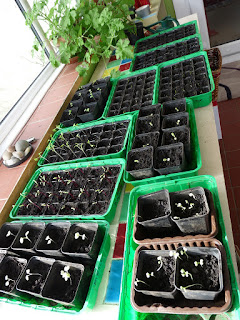
Then on to a polytunnel for extending the season. In this case, it is critical what the winter light levels are like since you'll be overwintering a lot of crops in it. Choose a very sunny levelish site with easy access to water. Our polytunnel is 20ft by 8ft, which is a great size for the home grower who doesn't want to grow vast quantities for sale but rather wants to keep growing salads and greens throughout the winter and have a wider option of veg to grow in the summer. Of course, it would be no problem to fill a larger tunnel, but it would also mean a lot more watering! A lot of things are better grown outside, such as onions, for example. And you don't have to worry about pests such as aphids as much. A 'cloudy' polytunnel cover is better than a fully transparent one since it lets plenty of light through but doesn't scorch plants in the heat. A south-facing conservatory or potting shed is very useful for pre-growing seedlings in the spring.

Fruit and nuts

When it comes to soft fruit, I'd get all my cuttings from other gardeners if possible, since they are so easy to grow from cuttings, especially currants and gooseberries. The same goes for vigorous rhubarb - a split of a plant that does well in your area is the way to go - and strawberry runners (which will need to replaced every three years to maintain vigour, easily done by taking runners from your plants in the summer after the harvest is done).

The orchard four years on
We have a dedicated soft fruit area, which could be netted over in a fruit cage arrangement (this makes harvesting easier since you can walk in and stand up). However, this hasn't been necessary so far, but it is a consideration in areas with flocks of pigeons especially. I've also made little hedges of berry bushes for most of the large veg beds and along the side of the main vegetable garden. I'd go for a huge variety of fruit, with some more unusual berries such as Siberian honeyberry (blue honeysuckle), Saskatoon berry and Chilean guava thrown into the mix to extend the fruit season. I'd rather err on the side of too many plants; that way, the birds can have some and there should still be enough left for you.

When it comes to fruit trees, I'd again err on the side of too many. We've ended up with eleven apple trees, two pears, two plums, two mirabelles, two mulberries, three cherries and one quince. It's crucial to get the pollination groups right, especially if you're in a remote area with no other fruit trees around! The one thing I would change next time is to make sure to have a couple of apple trees with apples that store really well; usually these are the late-fruiting varieties. We only went by flavour in our selection so none of our apples store particularly well without processing them.

Edible hedging around the veg garden
Other than planting an orchard, I'd also recommend incorporating edible plants into your hedging schemes. For example: crab apples, wild pear, wild plum, rosa rugosa (for rose hips), elder (for berries and blossom), hazel nuts, hawthorn (for berries), blackthorn (for sloes), sea buckthorn (for berries - this is quite a vigorous plant though, which can be invasive in some areas), guelder rose (for bark, anti-cramp medicine), willow (for wands and bark - natural aspirin - and as one of the best wildlife plants in the UK), tilia/linden (for leaves and flowers) and beech (for young leaves).

If I lived in a climate where they'd crop, I'd also plant lots of nut trees such as walnut, cobnuts and sweet chestnut. Now this is a really long-term proposition! Sadly, although they grow well enough here they only rarely produce a usable crop, with the one exception of hazelnuts - but we've yet to harvest a single nut from our 10+-year-old trees. In the meantime, we're going have a go at growing tiger nuts instead.

Following a programme like this will give a high degree of food self-sufficiency in just a few years, without needing to sacrifice interest and variety in the diet.


Monday, 13 November 2017

Processing apples

Harvest from one of our 12 trees
This year we had our first proper apple harvest, which prompted me to look into storing them for eating fresh through the winter. In a nutshell, I learnt that late-season apples are the best bet for storage and found out that hardly any of our apple varieties store well at all. So, Plan B: process them all before they were past their best, which turned out to be by early November for the two varieties with the best keeping qualities. We've now discovered that we actually prefer the apples in their processed forms rather than fresh, which is just as well.

We made every apple thing we could think of:
  • Dried apple rings
  • Apple sauce
  • Apple ice cream
  • Fruit leathers
  • Apple jelly
  • Apple wine
  • Cider
  • Cider vinegar
  • Apple cordial
  • Apple crumble (or pie)
  • Baked apples.

I forgot about apple butter, which is on the agenda for next year. Apart from the cider, everything turned out absolutely delicious. The cider is OK, but probably best mulled or turned into vinegar. Next year, wine or cordial only!

First off, I'd recommend the following equipment for speedy processing of apples:

  • steam juicer
  • electric dehydrator
  • apple corer
  • mandolin slicer.
Rosehips and apple thinnings in the steam juicer

I don't peel any of my apples - life's too short and there's all sorts of goodness in the skin. To separate the apples into juice and pulp, simply fill the steam juicer with your apples (zero processing needed) and steam for 90 to 120 minutes. Steaming times will depend on the apple type (one cooking variety took just 60 minutes to break down completely). Drain the juice (usually around one litre per fill) and reserve for further processing into jelly, wine, cider or cordial. Then mash through as much of the remaining pulp as possible. This results in a very fine apple sauce, which can form the base of fruit leather, ice cream or simply be bottled or frozen as apple sauce. Any few remaining bits left in the top of the steam juicer are gratefully received by chickens (if you have any) or can be composted.

Dried rings

Apple ring central
This is a great way of preserving apples. The dried rings are lovely to snack on and can also be used in baking throughout the year. Our main use for them is in our morning porridge, where they reconstitute into apple bits. Since we don't buy any fruit, I made 17 large jars of these, which will hopefully last us until June when the new season strawberries will be ripe.

To make apple rings, core the apples and mandolin slice to about 4mm (just under a quarter inch) thick. To prevent discolouration, dip into water with a little citric acid or lemon juice before dehydrating. Lay out the apple rings on your dehydrator trays so that they're not touching and dry at around 60°C/140°F. Drying times will vary depending on the dehydrator and your atmospheric conditions (anything from 4 to 10 hours) - best to check every hour from about the 4 hour mark and remove the rings that are dry. They should be leathery, but not brittle, and not show any signs of moisture when cut. Let them cool for 5-10 minutes and immediately store in an airtight jar.

Apple sauce

A very versatile and efficient way to store apples. You can either freeze it or bottle/can it (using the water bath method or heat the filled preserving jars in the oven at 170°C until bubbles start to form). Either use the puree from your steam juicer or core and mandolin slice 20-odd apples and cook on low heat with a little sugar, plus raisins or spices such as cinnamon or ginger, if desired. The sauce itself makes a lovely dessert, served on its own or with cream, creme fraiche or ice cream, or can be used as a pie filling at a later stage.

Ice cream

Follow our recipe for strawberry ice cream, but substitute the strawberry puree with fine apple sauce (from the steam juicer) and a generous pinch of cinnamon. This is one of the most delicious ice creams ever and we don't know why this isn't a known flavour.

Fruit leathers

Apple and quince fruit leather
The big discovery of the autumn. Wonderful, healthy snacks and fun to make! Simply make an apple sauce, add sugar, spices (cinnamon, ginger or chocolate are good) or other fruit of your choice (mash in quinces for a bit of zing or autumn raspberries, for example). Spread about 0.5cm thick on a piece of silicone sheet, plastic liner or similar and dry either in the dehydrator at 60°C/140°F for about 8 hours (scrape off the sheet about halfway through and place directly on the dehydrator mesh trays) or on the lowest setting on your oven (usually around 70°C). Leave to cool, cut into handy sized pieces with a pair of scissors and dust with icing sugar so that the pieces won't stick to one another (also looks nice). Store in an airtight glass jar.

Jelly

A good way to use up some of the apple juice from the steamer. Apple is good in a jelly combined with rosehips, elderberry or infused with rose geranium.

Wine

Follow our recipe for hedge wine using the juice from the steam juicer. Try adding some rosehips, brambles, elderberries or blackcurrants to the apples in the steam juicer for a nice blend of flavours. These wines can also be used to make vinegar at a later stage (see below). In my opinion, apple wine is one of the best homebrews, delicious hot or cold.

Cider

Small batch of cider
Since we didn't know anyone with a cider press to make cider the traditional way and didn't want to invest in one, I used the ready-sterilized juice from the steam juicer. It was quite a lot of work, running the steam juicer five times to get five litres of juice for a small batch, but at least I got plenty of by-products for making fruit leather! The result is rather tart, but hopefully bottle conditioning will improve it - we added a little sugar at bottling stage to carbonate it. Otherwise it will all go into vinegar production.

Vinegar

To make vinegar from cider or wine, you need to add some 'mother' culture to your alcohol to convert it to acetic acid. You could just leave the cap off your bottle, tie over a clean rag and hope for the best. However, for surer results and to speed up the process, add a cup of unpasteurised cider vinegar to your alcohol for your first batch, then tie over a clean rag and store it in the dark for at least a couple of months before straining it and feeding your resulting gloopy 'mother' with some more hedge wine or cider.

Cordial

Hot fruit cordials are a real delight in the cold days of late autumn and winter. Again, it's nice to combine the apples with rosehips, elderberries or blackcurrants for this. Once you've extracted the juice, add sugar to taste (usually 100-200g per litre) and then bottle/can for long-term storage. I'd err on the side of too little sugar, since you can always add a spoonful of honey to your hot cordial when you're diluting it with hot water. Unfortunately, I only made five half-litre bottles of apple & rosehip and apple & elderberry cordial this year and we're already on the last bottle. Next year, there will be a lot more of these.

Apple crumble (or pie)

Apple berry mix waiting to be crumbled
I'm usually too lazy to make things as involved as pies, but am happy to make a crumble every day! Core and slice the apples (with a mandolin slicer if you wish) and layer in an oven-proof dish. Sprinkle over 2-3 tbsp of brown sugar, depending on the tartness of the apples. Cover with a crumble mixture (100g flour, 50g sugar, 50g soft butter, a little bran if desired) and bake at 175°C/350°F for about 35 minutes or until crumble goes golden brown and apples are soft when pricked with a fork. Serve with creme fraiche, cream or ice cream.

Baked apples

Core the apples, stuff with dried fruit and chopped-up nuts of your choice, bake until they split and are all soft inside. Sprinkle over sugar mixed with cinnamon and serve with custard or double cream.

That's all our apples used up! And we now have a good system in place for efficient processing next year.


Tuesday, 28 March 2017

March round-up

Conservatory full of seedlings
March is the month of sowing, potting up and digging. First up were the tomatoes, chillies and sweet peppers. The chilli and pepper seeds were lightly sanded before sowing - this really speeds up their germination. Sixteen varieties of tomatoes this time, eight types of chillies and five sweet peppers. I just can't say no to heirloom tomato seeds. This means we can keep two plants of each variety and the rest will go to friends and neighbours. One of my friends who gave me some tomato seeds simply dries them on a bit of kitchen paper towel and then plants a piece of the kitchen paper into the soil. I can confirm this method works brilliantly - germination rates were very high.

Spring onions!
The second group sowing was the brassicas: four kinds of kale, savoy cabbage, red cabbage, white cabbage, two kinds of Brussels sprouts (early and late), cauliflower and romanesco. The broccoli and calabrese will follow next month - no rush since we still have plenty of purple-sprouting broccoli.


Spring is here!
Together with February's sowing of leeks, beetroot and salad stuff, this means the conservatory is filling up already, especially after pricking out and potting up the tomatoes and brassicas. The tomatoes are being pampered: They spend their days basking in the light in the conservatory, but are carried back into the lounge for an overnight stay on the windowsills each night. They really don't like cold nights.

The third lot of sowing indoors this month is peas and mangetout. We're going to try pre-growing them in sections of plastic guttering this time and then hopefully sliding off the seedlings into position next to a brand-new pea trellis made from fence posts and chicken wire. Slightly apprehensive about the sliding off bit, but hoping it'll go smoothly.

Planting Jerusalem artichokes
Outside, we sowed 400 set onions (Sturon and Setton) and netted them over to protect them from marauding blackbirds. We also replanted the nicest 20 Jerusalem artichokes. The parsnips were sown with seed that we collected ourselves. Parsnip seed doesn't germinate well after one year of age so it is vital to have the freshest seed possible. It was fairly straightforward to collect: We simply left a couple of parsnips in the ground and in their second year they flower and go to seed. The bees just loved the parsnip flowers.

Blackcurrant cutting come to life
Everything else outside has to wait until April when the next lot of indoor sowing (cucumbers, melons, broccoli/calabrese, celeriac, tomatillos, herbs) is also due. Squashes, courgettes, sweetcorn and beans have to wait until May here though I've sown one courgette to pop into the polytunnel for an extra early courgette crop. We find it best to plant squashes and courgettes out when they only have one or true leaves; they seem to suffer very little transplant stress that way.

While I've been sowing and potting up, Jim has been digging every day. The new area that we'd earmarked for our potatoes had to be temporarily abandoned since it was too wet to dig - maybe some of the cranberry cuttings can go into that! As always, it helps if you can stay flexible in this gardening game. Luckily we had another option: the newly de-brambled area next to the pond. The soil is beautiful there, though full of stones, and our potatoes will have a view! The first earlies (Dunluce) went in last weekend and the rest (Blue Danube, Sarpo Axona and Setanta) will follow in the first week in April.

Domino watches the mass hatching
Most of the cuttings that I've stuck in the ground over the past few months have taken and are now unfurling their first leaves. Amazing how easy it can be to propagate plants! I'm especially pleased that the Finnish greencurrants and the Siberian blackcurrants have taken. They will all stay in their nursery bed until November so that they can develop some decent roots before being moved into their final positions. The improved pond has been enthusiastically embraced by the amphibians. We had a mass hatching of frog and toad spawn, during which several common newts were spotted darting about. Now the thousands of tadpoles are cruising around.

Building a new bridge and steps
Another improved item in the garden is a our improved new footbridge over the burn. Away with the rotten wooden planks and in with stone slabs linked with 'crazy' paving of flat stones and bricks that we had dug up in the grounds. Jim even made a lovely little set of steps leading down to the bridge. This makes a very slippery, particularly when muddy, slope much safer.

The hungry gap has started - we've run out of potatoes, neeps and celeriacs, among a whole lot of other things. But at least there are beautiful spring onions, two types of kale, chard and lots and lots of purple-sprouting broccoli. And the new season salad leaves are not far off.

Saturday, 25 February 2017

February round-up

That's the autumn raspberries pruned
Frost flowers on the polytunnel
OMG celeriac crisps
Our wildlife pond
Cloches for early sowing
February is the month for pruning, other than cherry and plum trees. The easiest fruit to prune is the autumn raspberry: simply cut it back to the ground. Just as well with the number we have! The other fruit bushes such as blackcurrants and gooseberries are a bit more involved and I had to look up how to prune the goji berries for the first time: apparently an umbrella shape is what's wanted. I stuck about 100 cuttings into the ground as part of the pruning process, just to see what'll take, as well as some Siberian blackcurrant cuttings given to me by my uncle.

February has been the coldest month so far, with several frosty nights. We even had some frost flowers on the polytunnel - a first! Still, the cold hasn't held back the rhubarb or the daffodils.

We've used the cold and windy days to do a lot of food processing: another seven litres of kimchi are fermenting and several litres of ice cream made from local milk (vanilla, eggnog, chocolate and rum & raisin flavours) are chilling in the new freezer. It's nice to be able to all this processing at this time of year rather than in the summer and early autumn.

Another culinary highlight of the month has been our discovery of celeriac crisps. At least as delicious as potato crisps! Luckily we still have a dozen whole celeriacs left. Even more will be planted this year.

The pond area has had a full work over, with quite a few irises removed, and the frogs and toads obligingly deposited loads of spawn on 17 February. We also managed to clear the remaining bramble wilderness behind the pond and plant a rosa rugosa hedge with suckers from our existing plants. This means perimeter hedging is now complete.

But there was even more hedging to be done. A change in SEPA farmland regulations means that watercourses have to be fenced off from livestock so our neighbouring farmer fenced off the burn on the southern perimeter of our land. He gave us permission to plant in this strip - so in went 100 or so willow cuttings and some more rosa rugosa suckers. This is great news for us: Not only won't the cattle nibble on our hedge any more, we can also create double or triple hedging to the windiest side and create a nice wildlife habitat at the same time.

The new growing area, for this year's potatoes

After the hedge planting it was time to turn to digging. We moved the first bit of black plastic in the bottom paddock to start on this year's potato area. The soil looks good underneath, if a little heavy and several voles, who had a cosy environment beneath the plastic, scurried away. This time we are going to remove the plastic bit by bit so that weeds don't start to sprout again before Jim can get to the digging. I've started aerating the soil with the broadfork to help it dry a bit before digging commences. In the meantime the potatoes are chitting. The earliest we can plant them is last week in March, weather permitting.

Splitting wood - a regular workout


Wood processing continues when the weather is favourable. We're thinking about the best way to construct more permanent log stores. The split wood that we've stacked outside in between stacks of tree disks and roofed over with polycarb sheeting (weighed down by fish boxes full of stones) has dried much better than that in the wood shed. So we'll likely make permanent shelters next to the garage first, before tackling the shed.

Conservatory filling up with seedlings

When it comes to seed sowing, it's a real patience game this month. We don't want to sow things too early. Tomatoes, chillies and peppers, for example, will have to wait until the first week in March. Otherwise they just get too spindly before it's warm enough to plant them out into the polytunnel and greenhouse. However, there has been some early sowing of seeds: leeks (three varieties, colour-coded - the earliest variety is yellow), pak choi, lettuce, tatsoi, spring cabbage, beetroot and cauliflower. And since the weather has been mild, we also sowed some crops under cloches and in the polytunnel: shallots, hardy carrots, rocket, red mustard, radish, kohlrabi and more beetroot. Not long to wait now until the tomatoes get sown!


Tuesday, 18 October 2016

October round-up

Squashes of all colours unite
October is the month of pumpkins and squashes. They've occupied just about every windowsill in the house. Squashes can last a long time if harvested ripe and undamaged and then cured (stored at room temperature) for at least a couple of weeks. The curing also makes them sweeter. But, of course, some squashes don't ripen in time and need to be eaten quickly, like courgettes, and others rot or get nibbled by the wildlife.

Hen pheasant in the front garden
The wildlife has been busy in the garden this month, judging by the pile of badger scat and the chomped-off raspberry bushes and roe deer scat. But most of all we've had pheasants. The shooting season has just started for them and both our farmer next door and the nearby estate breed pheasants for the hunt. Gangs of them can be seen roaming the farm track and our front garden, middle and bottom paddocks have been thoroughly checked out. We've already bartered pumpkins for pheasant thighs.

Shaggy Ink Cap fritters
We've also added wild mushrooms to our diet. Ever since going on an excellent mushroom foraging walk in late August and investing in a few good field guides, we've been on the lookout for mushrooms. Unfortunately, we haven't had as much time for mushroom hunts this autumn as we'd hoped, but we still managed several good meals. My favourite so far has been Shaggy Ink Cap fritters. Next autumn we'll know at least one good spot nearby already and we've got lots more woodland to explore.

The survivor
This month, the chicken flock has reached its target size: one cockerel (Feathers) and six hens. We figure six hens is a good flock size for two people. There is always at least one hen not laying (moulting, too old to lay every day, having a winter slowdown etc.) and excess eggs aren't difficult to get rid of. Feathers ended up as the new 'leader' since he seems a quiet chap with little interest in crowing or fighting (at least so far) and has been spotted breaking up fights and stepping up to defend the hens from the cats (though Domino just wants to play).

Blueberry bushes turning
We haven't got much by way of autumn colour in the garden. Most of the leaves are falling in the gales before they're changing colour, but the blueberry bushes are putting on a fine display. The other burst of colour in the garden are large glossy rosehips - it's a bumper year for them.

Big hips


Jerusalem artichokes in flower

The ocas have been earthed up and the first Jerusalem artichokes, parsnips and swedes have been harvested. Plenty of spent plants are bulking up the compost heap: sweetcorn, courgettes, squashes. Only ten tomato plants are left and the flow of tomatoes has slowed to a trickle. The baby sweetcorn actually gave us a decent crop so sweetcorn production is being continued. Next year we'll try a few in the polytunnel.

Baby corn 'Snowbaby'
Other than harvesting, it's mainly a case of clearing up at this time of year. A bit of cutting back here and there, the last mow of the season, composting annual plants that are finished. The main planting job is the big garlic sowing at the end of October. This year, we'll use our own seed garlic since we have enough to do so and the variety did really well.

This is the month when we've had the most visitors: every weekend booked and the half-term week. There are still plenty of fine sunny autumn days and on the foul days we can follow the cats' lead.

Poppy and Domino having a snooze day


Sunday, 16 October 2016

Berry propagation

Cranberry runner forming roots
Berries do wonderfully well here in Scotland. They like the acidic soil where we are, they like a bit of cold winter weather and being generously watered throughout the year. And, unlike fruit trees, most berries start giving a decent crop very quickly: strawberries in their first year, gooseberries and raspberries in their second, currants in their third. Another nice thing about berries is that you pick them over a good month or two, as they don't all ripen at once.

Blueberries: an early-spring job
Since they do so well, we've decided to concentrate on berries for our fruit supply (while we wait for a decent crop from our fruit trees) and expand our stock from our existing plants.

A lot of berry propagation is by way of hardwood cuttings: this works for red, white and blackcurrants, cranberries, blueberries, gooseberries and blackberries (the latter two can also be propagated by layering). Apart from blueberries, where cuttings are best taken around March time, all other berry cuttings should be taken now, in the autumn.

Our Early Black cranberries have put out a lot of runners which, obligingly, formed roots - a good starting point for the cranberry cuttings. I took 36 cranberry cuttings, which was pretty easy and quick to do. Even if only a handful make it, this will be an amazing cost saving.


The latest strawberry bed
Strawberries are easy to propagate from runners. Their yield tapers off dramatically after the third year, so it's recommended to replace plants thereafter (and even sooner for perpetual varieties). To keep track of the age of our strawberry plants, we've decided to set up a rotation with three beds of roughly the same size. Each year, in late summer, we take runners and start a new bed so now we have three: one that will have to be completely replaced after next summer, one in its prime and one just starting out. Totally emptying a strawberry bed after three years also makes it easier to dig in fresh fertiliser and dig out unwanted interlopers like couch grass (grr). 

Strawberry runner putting out roots

Potted up runner
Because strawberries are prone to slug damage, all of our strawberry beds are either raised beds or surrounded by stone chips to deter gastropods. Growing them in a container would also work.

To make new plants from runners, select a healthy-looking specimen from a healthy-looking mother plant. This can be done from July onwards. The runner may already be forming roots, even in the air. Pick the one closest to the mother plant if a row of them has formed. Pot it up and securely pin down the link to the mother plant with a paper clip. Leave it for at least four weeks to make sure it is well rooted, then cut the umbilical cord. It is now ready to be transplanted.

The raspberries have made it
all the way into the herb bed
Potting up a dozen or so runners that way is extremely straightforward and should be enough to start a fresh bed. There shouldn't be any need to buy strawberry plants ever again - unless you want a different variety.

One berry that you won't need to actively propagate is the raspberry. It will do all the work itself. It's more a question of stopping them from taking over...


Friday, 30 September 2016

September round-up

First lot of the winter squashes
Fallen apples after the first gale
September is a time of major harvesting. First the maincrop potatoes (now stored in the summer house), then the quinoa. August's glut of tomatoes has been replaced by one of beans and the squash harvest has begun. And, finally, we're getting good amounts of fruit. Both apples and raspberries are in full swing and we've also picked some brambles for jelly. I'm very excited about the first ten pears hanging on our best pear tree.

Unfortunately, September is also often a month of gales around the time of the autumn equinox. This year we had two pretty wild ones, one of them 36 hours long. The hedges have helped and we haven't had any damage other than half of our apple crop falling down, the poor sunflowers suffering badly and the top of the bean poles getting scorched. Dwarf beans next year! Nothing must show above the parapet.

The herb corner in the top paddock
Because we took a couple of weeks off from mowing to refurbish and paint the garage we've had a hard time getting back on top of the grass cutting. It's a bumper year for grass and it's been like painting the Forth Bridge (before the new paint). But we've finally caught up and the paddocks are looking their best ever. All the mulch has found a useful home. Now we're going to take another couple of weeks off mowing to get the wood chopped and stacked for the winter and then there'll be the final mow of the season.

Freshly mown middle paddock
Not much sowing this month. I've only sown our overwintering lettuces (Valdor, Winter Density and Merveille des Quatre Saisons), tatsoi and cauliflower and have taken cuttings of the Vietnamese coriander to have small plants overwintering in the house. Last year one plant survived outside covered in fleece, but it was a very mild winter.
Feathers (left) and Wingco (RIP)

In the world of chickens, all is well, apart from for the young cockerels. We've already started the job of decimating them since two of them targeted the oldest hen until she had hardly any neck feathers left and was hiding in the hen house. So they were obvious early candidates for the pot. First to go was Omega (nomen est omen) and next up was Wingco, a very sizeable bird for his 3.5 months. Now just one more to go until we have the optimum cockerel number of one (though some might argue that the optimum number is zero). It looks like Feathers will be the lucky cockerel. He's the only one actually protecting the hens and breaking up fights.

Rainbow chard, parsnips and nasturtiums
The summer crops are coming to an end: broccoli, romanesco, courgettes, tomatoes, beetroot. Cabbages, kale, chard, beans and carrots are still amply available. The sweetcorn is looking good for the first time ever. And some winter crops are starting up: swedes, parsnips, pumpkins and lots and lots of squash. Other winter veg (Jerusalem artichokes, celeriacs, leeks, Brussels sprouts, purple-sprouting broccoli and oca) are nowhere near ready yet. Something to look forward to it in the new year.